Photography Baja Norte, BC Mexico

I find it amazing that we can process and share our photos during our travels, while we are actually on the road. But one of the nice things about coming back from a long trip is having the time to review your catalog of photographs with fresh eyes and to properly retouch the best photos.

I thought a slideshow photo essay would be an interesting way to present some of my favorite images from the northern part of the Baja peninsula in Mexico
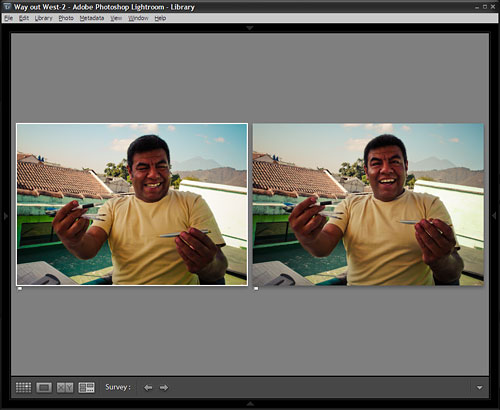
I re-processed the photos in Lightroom, converted them to a warm, high-contrast black & white and brought out the details with dodging, burning and sharpening.


I was going for a moody, sinister look - more for fun than for journalistic accuracy! - I put together the soundtrack to match the mood (Bass, MS10, percussion and turntable for those who are into such things) 

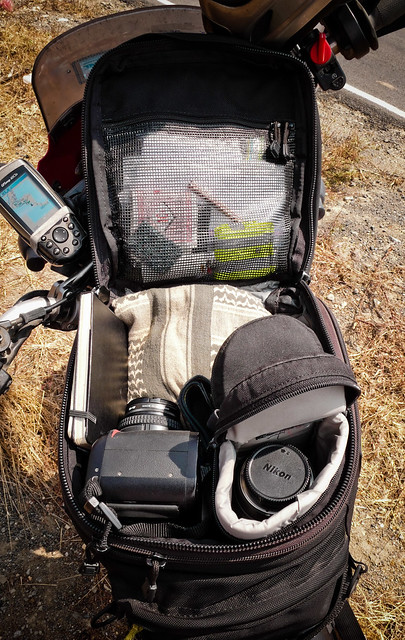
Most of these photos were taken with the Panasonic LX2 compact camera while sitting astride the motorcycle, the rest were shot with the Nikon D200.

I've written before about moving the camera postion to adjust the composition of the image. I haven't though about it till now, but I tend to ride the motorcycle into place for the best composition  the same as I would on foot.
I'll ride slowly once I see an interesting landscape, than inch along the shoulder of the road until the elements of the landscape snap into position. I'll move until I see a nice "S"curve in the road, until the cactus sits in the perfect spot on the side of the frame, until the massive mountain perfectly balances a boulder in the foreground.


The slideshow was put together on an ancient and borrowed Mac with iMovie 4, which would not be so bad if it did not take 6 hours to export a two minute high-res video. Lots to learn yet!

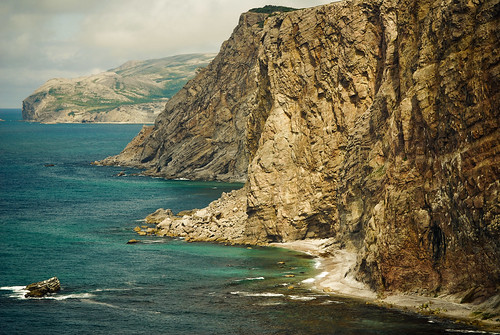
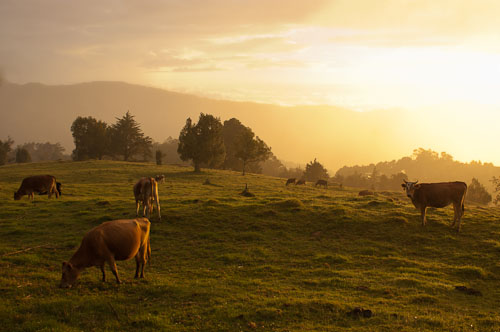
Here are some hi-rez photos to compare - click for full size and feel free to use them as desktop backgrounds. 

This photo was taken with a Nikon D200, it dealt very well with a high contrast scene that would have been too much for the LX2 compact. Notice how the detail in the distance holds together.


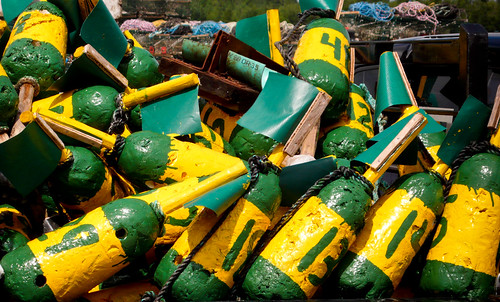
And this one was taken with the LX2 compact. It did a respectable job, but you can see we loose detail in the far distance. But That's as nit-picky as I get. I believe content trumps pixel-peeping, and I'm happy with the photo! 

WorldRider Allan Karl interview


Allan Karl is a motorcycle traveler, writer, photographer, musician and public speaker.
In 2005 Allan packed up a few things on his BMW F650 and left behind his home in California. 
He rode north to Alaska to properly begin his ride the length of the Americas. From Brazil he crossed the Atlantic to traverse Africa before finally pausing in Istanbul. 


On this last trip Allan visited thirty-five countries and photographed the people, places, and experiences he found along the way.


I was inspired by Allan's WorldRider trip on ADVrider to take-up motorcycle travel, so I was really happy to catch-up with him to ask a few questions.


Anthony: 
So when you first set out on this trip, did you have any travel experience from before?

Allan: 
I convinced my parents after graduating college that I wanted to move to California. I was always a fan of road trips and this cross-country cruise in a borrowed car ignited the travel bug that'll be with me until I die.

Just a few years later an older friend of mine was planning a trip to Indonesia. and asked if I'd like to go. That trip - when I was just 24 - lasted two months and involved cruising eight Indonesian Islands. On each island we rented motorcycles, small 125-175cc two-stroke Japanese bikes.

I made every effort to travel, by motorcycle when possible. Before I embarked on my WorldRider trip I had been to about fifteen countries and traveled to forty-five American states.
Travel had become more important to me than any material possession, except maybe my Mac and my camera!

WorldRider is the culmination of my dream to see the world. And I'm not done yet.


And how about the whole photography thing, was that something you were into before the trip, or was it the trip that sparked your interest?

Ocular Dominance for Photography

Everybody knows that you're either left or right handed. But do you know if you're left or right eyed?

You have one eye that's better at judging distance, focus and motion. Most people look through the viewfinder of an SLR with their right eye, but maybe it's not the best thing for you...


Here's a great little trick I learned  out in the country last summer, while target-shooting a .22 rifle with a friend.

He told me a story about when his wife was learning to shoot. She was having a hell-of-a-time hitting the targets they had set up. But their neighbour had a suggestion. He told her to look at the target with both eyes open and point directly at the target with her finger. Then he told her to close her left eye, than her right eye.


"Which eye sees the finger pointing straight at the target?"
"The left eye!" She said.

*Crack!, Crack!*
Sighting down the rifle with her left eye instead of her right, she was hitting the targets like a sniper! Her dominant eye was the left one.

In photography, determining which eye is dominant will help you to track moving objects, judge focus and better see the information displayed in the viewfinder. And it's just more comfortable. Try it out!

Which eye do you shoot your SLR camera with?


Update

Speaking of which eye you might use with your camera, I've found an amusing article on the Luminous Landscape website entitled: Photographers Have Noses

Also, check the comments below for an alternate test if the pointing finger test isn't working for you.

Take control of autofocus with your SLR - AF-ON

I first heard Jason Odell and Rick Walker give this tip a few years back, on the excellent Image Doctors podcast. This is absolutely one of the best techniques for getting better performance out of the autofocus on your SLR.

Most modern cameras auto-focus by pressing the shutter button halfway, but this new camera set-up moves the autofocus off the shutter release, onto it's own button, giving you separate control of focus and shutter.

It's a bit like riding your motorcycle off-road; having separate controls for the front and rear brakes allows you to adapt to the situation as needed.

It takes a while to get used to the new camera setup, but I'll bet you never go back to the old way!

Check out Jason's video below and go to his blog post for the full explanation

This video and blog post are specific to Nikon cameras, but surely it's possible to do this with Canon or other brands. Let me know in the comments if you have any "how-to" links for other camera brands!

Canadian Motorcycle trip photos

About a year ago today, I bought a ferry ticket to take my KLR650 from Baja to mainland Mexico.
Today, I bought an avalanche shovel, to dig my way through the snow into my apartment! That's what you get for living so far north...

But Tim,  (Drunkwombat955)  fellow ADVrider from Australia says:
"Its getting feggin hot here in Australia again, and maybe looking at pictures of your country will help!"

Plenty of folks have chimed-in with some great photos and I've put up my contributions from my Canadian travels here:

Here are a few small samples, but check out all the large photos at the link above.

Maritime-0089-125.jpg

Maritime-9982-106.jpg

Maritime-1200238-5.jpg

Way out West-2

Way out West-0442

Way out West-1126

Vancouver Island-5509

Vancouver Island-4628

Vancouver Island-5270

Motorcycle Travel Photography E-books

Motojournalism Book One - The Foundation

Our motorcycles give us a unique ability to experience real adventure and authentic explorations. These agile vehicles allow us to get far out into the wild, cross borders and break the ice with people around the world. The variety of photo opportunities we encounter every day is incredible. We’ll see the sun crest a ridge in the morning, we’ll ride hundreds of miles over challenging and varied landscapes, discover a new town, meet interesting people, then watch the sun drop into the ocean in the evening - all in a single day.

We take pictures of our adventures to remember the challenges of the terrain and the beauty of the road, to share exciting stories with our friends. But sometimes we get back home, disappointed to find that the photos just aren't as good as when we were there.
How often have we heard “Sorry for the bad photo.” “It’s steeper than it looks.” or “The photo doesn’t do the place justice.”


Motojournalism Book One is about taking better photos of your adventures with the camera you have now. Written from a motorcycle travel perspective - but applicable to all overlanders - Book One teaches the foundational photographic techniques you need to come home with great photos of your travels.

This book is not about equipment. This book is about taking better photos with the camera you have now. The basic principals covered here will improve your photos whether you are using a $5000 digital SLR or the camera of your mobile phone. Knowing how to choose a subject and compose an image and choose the best photos will have the greatest impact on the success of your photography.

Book One - PDF E-Book 41 pages $10
Buy Now


Through text and examples, each chapter describes the essential techniques for creating compelling images of your travel adventures.

Whether you are headed for Tierra del Fuego or Terre Haute Indiana,  these skills can be used right away with the camera you have now.

The book is divided into seven main sections
  • Keep it Simple
  • Rule of Thirds
  • Get Close
  • Background
  • Layered Landscape
  • People
  • The Edit


Motojournalism Book Two - The Tools


Motojournalism book two is all about how to choose the camera equipment for your overland travel, how to pack it securely, and how it all works. Though the book is written with the small luggage capacity of motorcycles in mind, all overland travelers can apply these extended travel techniques.
Through illustrations and hands-on examples, you will learn the photo essentials of manual mode, aperture, shutter-speed, ISO, exposure compensation, the histogram, and more.There's nothing quite like this out there.

  • Camera choice
  • Lens choice
  • Buying gear
  • Packing gear
  • Accessories
  • Shooting modes
  • ISO
  • Histogram
  • Exposure compensation
  • White balance
  • Backup on the road

Book Two - 49 hi-res, information packed pages $15.
Buy Now


MotoJournalism - Book Two - The Tools_Page_01


MotoJournalism - Book Two - The Tools_Page_02

MotoJournalism - Book Two - The Tools_Page_11

MotoJournalism - Book Two - The Tools_Page_34

MotoJournalism - Book Two - The Tools_Page_18


Compact cameras for travel photography

Many folks out there see people taking photographs with a great big "professional" SLR and think; "Well, If I had all that gear he has I could take good photos..."
Other people might spend thousands of dollars on "professional" equipment and wonder why there photographs aren't improving.

Having good equipment will let you get photos that you that you'd otherwise miss, but it won't make you a better photographer.

I really believe that the things that make the biggest difference to your photography - composition, subject, colour - can be learned with any camera.

But to be realistic, you have to work within the limitations of a compact camera. It's tiny digital sensor means you'll have a tough time getting a pocket-sized camera to work well in low-light or fast action situations. You're stuck with the lens that's attached to the camera, so you probably won't be able to get that shallow-focused soft background you see in some portraits.

A small camera will work great in good light with still or slow-moving subjects. Concentrate on the composition, the colours, the interesting subjects, and polish the photos up with some post-processing. 
After all - when we're talking about content - a good photo is a good photo whether it's taken with an iPhone or a Hassleblad.


 The secret to this photo was the fantastic natural light and a simple black and white conversion. The workshop of los hermanos Juarez in Antigua, Guatemala had the left side of the room completely open to the light, and sun pouring through windows on the right. I could not have set up studio-strobes better than the available light that day.

Simple straight-on compositions work well with any camera.

 My battered Lumix LX2 never leaves my side.

Where you stand - Camera position

When we see a subject we're interested in, our brain concentrates on the subject itself while ignoring everything else around it. We just don't see what's happening in the background while we are taking the picture. It takes a conscious effort to pay attention to what is going on behind the subject of the photo.

This is why you find many vacation photos with people that have trees "growing out" of their heads.

It's easy to ask our friends to move to a more photogenic location,  but how can we control the background with a less cooperative subject like this concrete monument?


*click to enlarge


Gear review - The North Face Base Camp Duffel - Thews' Reviews

Take a minute to check out Thews' Reviews, "The place for diverse and varied reviews of dubious consistency." 

I've just done a guest post with thoughts on the venerable North Face duffel that's been hauling my gear all over the place.

Check out the review here!


Matthew's put up a lot of great reviews over the last few years, and often for things you wouldn't expect.

A few favourites:
Zeiss Ikon rangefinder


Composition tip - Pattern recognition

A quick composition tip today. It's quite an easy technique and can produce a lot of "wall worthy" photos from your travels (or your hometown for that matter).


What aperture did you shoot that?

From Australia: a great ad for the Lumix G2
It's meant to advertise the "intelligent auto" settings of the camera, but it reminds me that the basics of composition are more important than knowing about specific settings.
That's why I don't make a single mention of aperture or shutter speed in book one. You've got to build that foundation of knowledge, arranging the elements in the frame, keeping it simple, waiting for the right moment, choosing the best photo. That's why Book One - The Foundation works with any camera.

Get that under your belt and then learn about f2.8 @ ISO500 +1.5EV to push your photos to the next level.


*UPDATE*


In response to Macrobe's excellent book recommendation I thought I'd post that book and two other great photographic resources that are worth spending some time with.

Flipping through the Amazon preview of  The Photograph I saw those famous early images from Stieglitz and Steichen, Muybridge and Marey and was reminded of Jeff Curto's History of Photography podcast. Jeff is a professor of photography at a college in the Chicago area, and for the last several years he's been recording his class-sessions, and along with the presentation slides, uploading them as free podcasts.

So in other words, free college-level course to listen to whenever you damn well please!
He teaches in a really entertaining, down-to-earth, approachable way and it's a hell of a lot of fun to listen to. Highly recommended! http://photohistory.jeffcurto.com/


Those flexible Mexican kilometers

It's not apparent at first glance, but these two "Hassle Free Zone" signs in the photo below are actually two-hundred-twenty-two kilometers apart.


I also noticed the remarkable flexibility of the Mexican kilometer on my way to Chichen Itza, where the highway signage indicated that I was actually getting further from my destination as I headed straight for it. 

The signs read: VIADOLLID 60km.  Ten minutes later: VIADOLLID 60km. (still). Another ten minutes of highway and a third sign read: VIADOLLID 72km. The apparent wrinkle in time settled back to normal after that and I arrived in the city in about an hour. No hay problema! You'll get there when you get there!

Working the numbers - How many photos should I take?


I was listening to episode #653 of the excellent Lenswork podcast that brought up a very important point about the quantity of images needed to find the "one" image that says it all.

In Motojournalism Book One  - The Edit chapter says to take many and show few. But how many?
It depends on the situation. There's no magic number, any situation with fast action will require more exposures than a landscape would.  The idea is to give yourself plenty of options to choose from, so when you get down to the edit  you can narrow your photos to the one image that captures what you saw, and how you felt when you saw it. It took five shots in a couple minutes to get one good image of this gravestone in El Salvador.

Here are two more examples of photographic situations that I've been in.

30 photos in ten minutes

Sunset in the cloud forest of Costa Rica. I had to rush to find a place to sleep for the night, but I knew I'd be kicking myself If I passed-up such a great scene.

The light was changing fast and there were a lot of things to try:

  • I used exposure compensation to make some images lighter and some darker. 
  • I walked around 'till the silhouettes of the trees framed the image. 
  • Some photos were shot vertically, some horizontally. 
  • Some were shot directly into the sun, others off to one side.
  • Some featured the fence in the foreground without the cows, another featured only the cows.


Like Brooks Jensen says in the Lenswork podcast, I didn't know what image was going to work, and I didn't worry about it. I just knew I had plenty of material to work with once I got to the editing process.

This one image worked for me because it captured the glow of light, the haze in the air and the rich colours in the landscape. Just the way I felt it when I was there.


Two photos in as many seconds.

In Antuigua Guatemala I gave maestro Carlos - my Spanish teacher - a half-joke gift, he was using his Bic pens till the absolute last drop of ink, so I bought him a nice pen.

I had my compact camera at-the-ready, snapped two photos, and the moment was gone.

Technically the photos aren't wonderful - the light is not great and the horizon is plenty crooked - but the expression on Carlos' face nails the moment!


Make 'em count

One thing I think is important when shooting many photos, is to make a real effort in each shot you take. Carefully consider what's in the frame and how you are shooting it rather than blasting away wildly. Make each shot count!

How many photos do you take?

Motojournalism Book 2 review in Traction Enduro magazine

Big thanks to the crew over at Traction magazine for giving Motojournalism book 2 a review!
Check out the rest of the issue below (click for fullscreen) , there's some great stuff in there. Traction is quite possibly the most irreverent motorcycle magazine out there. It's a hoot!


Open publication - Free publishing at issuu 

Interview at MotorcycleMexico.com

Ben Slavin of MotorcycleMexico.com caught-up with me for an interview a while back.
Ben's been all the way to the southern tip of Argentina on his ol' KLR and he's back on the road again in Mexico right now!

I've got to get a helmet-cam for the next big ride...
He's got some great videos that bring back the memories of the trip, go check em out on MotorcycleMexico.com!

And you can read Ben's interview of me here.


Lane Splitting In Mexico from Benny on Vimeo.


Packing camera gear on the motorcycle.


I mentioned in Motojournalism Book Two that having quick access to your camera gear is key. You're gonna miss a ton of great photos if it's a hassle to get your camera out.


Gus from Florida sent me a few shots of his tankbag setup. He's found a great way of keeping things safe and organized using the padded dividers of an old camera bag:

"I bought a wolfman tank bag, gutted one of my lowepro camera bags and used it's dividers to turn the wolfman bag into a motorcycle-camera-bag. The bottom is padded the same as a typical camera bag is, so all I needed was the padded dividers. It worked great during our last trip where we rode from Miami to West Virginia."


Looks like it works great! One more thing you can do is attach the shoulder strap from the camera bag onto the D rings of the tankbag to make it easier to carry when you're walking around.

Here's a shot of my setup on the road: Same Wolfman Explorer bag, works perfectly on the KLR650. 
I keep a sweater or scarf underneath the camera and lenses. I have the Nikkor 28mm 2.8 on the Nikon body, and the 85mm 1.8 Nikkor and 11-16 2.8 Tokina are kept in the LowePro slip-lock cases.
Way out West-1310261